Pages

Monday, January 31, 2011

Disable/Block Sharepoint Designer 2010


For "disabling SharePoint Designer in 2010" complete the following steps:
  1. Open Central Administration 
  2. Select Application Management 
  3. Select "Manage Web Applications" 
  4. Select the desired Web Application for which you want SharePoint Designer disabled, then Under "General Settings" select "SharePoint Designer" as seen below:


Uncheck Sharepoint designer and Click "OK" to save your changes and SharePoint Designer is now blocked/disabled for the Web Application.

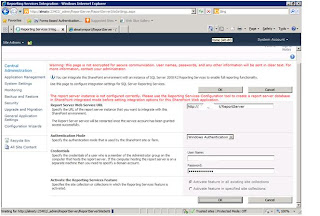
Report server instance not configured correctly


If you get the above print screen error message while you configuring Reporting service URL in your sharepoint Central Admin page.
The following Cause might be happen,
1. Your Existing SQL server Reporting Database is not Sharepoint Integrated Mode
2. SQL Reporting Service was running under sqluser@domain.com
So verify your SQL server Reporting Service Mode and service Account.

Solutions:
1. if your SQL is not integreted with Sharepoint please follow the below steps

Go to Reporting Services Configuration Manager > Connect to the SSRS Instance on APPSEREVER > Click ON Database > Change Database > Create new reporting server database, next > SharePoint Integrated Mode, next > Accept the Service Credentials, or enter the correct one > Next, Next Finish..
Finally restart the SQL reporting service.

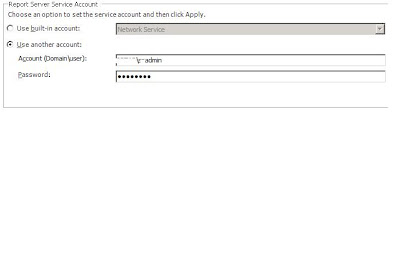
2. if your sql reporting service running under username@domain.com, follow the below steps.
Go to Reporting service configuration manager > Connect to the SSRS instance on appserver->Click on Service Account-> Click another Account and change to Domainname\sqluser and provide password

Saturday, January 29, 2011

Enable Mixed Mode Authentication in SQL


For "enable mixed mode authentication", please follow these steps:

  1. Log into your server through Remote Desktop Connection (instructions for connecting to your server through RDC can be found here).
  2. Click StartProgramsMicrosoft SQL Server 2005/2008/2008R2 and select SQL Server Management Studio Express or SQL Server Management Studio, depending on your version of SQL Server.
  3. Enter the requested information:
    • Server Type: select Database Engine
    • Server Name: this field should be populated by default
    • Authentication: select Windows Authentication
  4. Click Connect.
  5. Right click the server name and select Properties.
  6. Click Security.
  7. Under Server authentication select SQL Server and Windows Authentication Mode.
  8. Click OK.
  9. Right click the server name and select Restart. Wait a few moments for the service to restart before proceeding.

Install sharepoint in SQL authentication method

Below steps for "Installing sharepoint 2010 in SQL authentication"
  1. Configure SQL Server to use mixed authentication. You can configure SQL Server to used mixed authentication when you install SQL Server. For information about how to change the authentication mode after you install SQL Server, visit the following Microsoft Web site:
  2. Add a new SQL Server account in Microsoft SQL Server 2005. Then, grant the roles of security administrator and database creator to the account. To do this, follow these steps:
    1. Click Start, point to All Programs, point to Microsoft SQL Server 2005, and then click SQL Server Management Studio.
    2. In SQL Server Management Studio, expand Security, right-click Logins, and then click New Login.
    3. In the Login - New dialog box, type the name of the SQL Server account, clickSQL Server Authentication, type the password, and then click Server Roles.
    4. In the results pane, click to select the following check boxes, and then click OK:
      • dbcreator
      • securityadmin
  3. In the domain in which the server that is running SharePoint Server resides, create new domain accounts for the SharePoint Server service account and for the SharePoint Server Application Pool account. To do this, follow these steps:
    1. Click Start, point to Administrative Tools, and then click Active Directory Users and Computers.
    2. In the Active Directory Users and Computers snap-in, right-click Users, point toNew, and then click User.
    3. In the New Object - User dialog box, type the account name that you want to use for the SharePoint Server service domain account, and then click Next.
    4. Type the password two times.
    5. Click to clear the User must change password at next logon check box, click to select the Password never expires check box, click Next, and then clickFinish.
    6. Repeat steps 3b to 3f to create the SharePoint Server Application Pool account.
  4. Install SharePoint Server 2010. However, do not select the stand-alone installation. After SharePoint Server 2010 is installed, click Cancel when you are prompted to run theSharePoint Products and Technologies Configuration Wizard.
  5. Log on to the server that is running SharePoint Server 2010, click Start, click Run, typecmd in the Open box, and then click OK.
Run the below stsadm command

once you run the command, you finished the creating central admin and farm

The Central Admin path is set automatically on Port: 14370 (in my case), but not deployed on IIS Server. (check IIS Manager and you will see no central admin is deployed, the Farm is also only created on WSS v4 level because the SharePoint Server Features are not installed & deployed)
To provision the central admin on IIS you can execute:  psconfig –cmd adminvs -provision
Now check your IIS and you will see the central admin web application:
clip_image017
clip_image019

Now while you browsing services/feature, you could find the some missed features, So Finally we have to Rerun the SharePoint Configuration wizard in the GUI Mode and then you will all the features.


Installing Sharepoint Foundation 2010 Without AD

we could install "sharepoint server/ Foundation 2010 on the Local Machine using Local User Account using Standalone Method".

 First install the prerequisite software and proceed the installation using standalone, the print screen is below for your Reference.


Taxonomy feature has not been activated

If you got the below error Message while trying to create a Managed Metadata column in your list  in the particular site collection.


Solution:
Run the below powershell command in the sharepoint server 2010.
Enable-SPFeature -Identity 73EF14B1-13A9-416b-A9B5-ECECA2B0604C -Url <URL to your Site Collection>
Example:
Enable-SPFeature -Identity 73EF14B1-13A9-416b-A9B5-ECECA2B0604C -Url http://aurramu.blogspot.com/


Event ID 5555/ Failure trying to synch user profile

If you got the below Event ID 5555 in the event viewer for your sharepoint User profile web application follow solution steps.
Solutions:
Run the stsadm command
stsadm -o sync -DeleteOldDatabases 0

Finally start the full user profile sync for the sharepoint User profile.