Pages

Thursday, August 11, 2011

Lync Online Features

Lync online is next-generation cloud Communications services that connect people in new ways, from virtually anywhere.Lync is integrated of Office communicator and Live meeting.

Features of Lync online​ 

1. connect with others through lync contact photos, activity feed and interactive contact card in office
2. move easily from instant messaging into ad-hoc online meetings, including audio, video and screen sharing
3. conduct online presentation including audio, video, screen sharing and a virtual whiteboard
4. Invite external contacts to easily join online meetings via a pc or web based client
5. connect with customers and partners through IM, audio and video federation
6. View presence status and click to communicate from within Microsoft Outlook, Office SharePoint, and other Office applications.
7. Connect with Windows Live Messenger contacts using IM, audio and video calls directly from Lync

Thursday, August 4, 2011

Outlook Social Connector is not updating Sharepoint My Site Feeds

I have configured User profile service and My Site inSharepoint 2010and I have installed Outlook Social Connector to all Client Machine. When the Sharepoint User Made the Changes in Activity Feeds in Sharepoint My Sites,  it was not updated in the users outlook Social connector. So i have done the below steps in sharepoint server 2010.

1. Open Central Admin Site and Click Monitoring
2. Select "Review Job Definitions" and Enable the " User Profile Application - Activitiy Feed Job"  Timer service.

Monday, August 1, 2011

Sharepoint Config/administration database status in Suspend Mode

I have received the " Cannot connect to the Sharepoint configuration  database " Error Message when opening the Central admin site and Finally found that " Sharepoint_config" Database was in Suspend Mode.


I ran the following SQL Query Script on the Sql Management, before running the query, please take the backup of the .mdf and ldf file.

– Use the Master database
Use Master

– Verify that database has issues
EXEC sp_resetstatus ‘SharePoint_Config’

– Put the database in emergency mode
ALTER DATABASE SharePoint_Config SET EMERGENCY
DBCC checkdb(‘SharePoint_Config’)

– Set the database in single user mode
ALTER DATABASE SharePoint_Config SET SINGLE_USER WITH ROLLBACK IMMEDIATE

– Repair the database with data loss
DBCC CheckDB (‘SharePoint_Config’, REPAIR_ALLOW_DATA_LOSS)

– Set the database in multi-user mode
ALTER DATABASE SharePoint_Config SET MULTI_USER

– Verify that database is reset
EXEC sp_resetstatus ‘SharePoint_Config’

Now the Sharepointconfiguration database mode should be running smooth and you could open the central admin site as well.

I have Reffered the below urls for the issue.


Thursday, July 21, 2011

MSCRM 2011 Integration with sharepoint for document management

      Below steps for integrating MSCRM 2011 with Sharepoint for Document Management

      1.       Download and install the CRM list component for SharePoint on the SharePoint site.
2.       Activate the CRM list component feature in the SharePoint site

3.       Now go to the CRM online site or CRM on promise site
4.       Go to the Settings Area and select “Document Management” and select “Document management settings”
5.       In the document management settings page, Give the SharePoint site url where you have installed CRM list component and Click Next
6.       Now the url get validated
7.       Then  select folder structure based on specific entity  and click next


8.       Now the document library creation will happen in SharePoint once you give the confirmation.


9.       Once the document library creation is done, click finish.
   
10.   Now go the CRM record which you want to create a folder and storing the document in.

11.   Click on document in the left navigation and click OK button for confirmation dialog box
12.   Now the folder created in the SharePoint where the user wants to store document.


Friday, July 8, 2011

Failed to create the configuration database.One or more types failed to load

I have got the following error message when running the sharepoint configuration wizard on MOSS 2007 "Failed to create the configuration database.
An exception of type Microsoft.SharePoint.Upgrade.SPUpgradeException was thrown.  Additional exception information: One or more types failed to load. Please refer to the upgrade log for more details.
Microsoft.SharePoint.Upgrade.SPUpgradeException: One or more types failed to load. Please refer to the upgrade log for more details"


Cause:
            I hae installed MS office 2010 on that machine. So that sharepoint getting the Error message.

Resolution:
                I have uninstalled the MS office 2010 and ran the configuration wizard.

I have refer the below link to fix this issue http://www.networksteve.com/enterprise/topic.php/Failed_to_create_Configuration_Database_for_MOSS_2007_on_Windows/?TopicId=3887&Posts=12

Thursday, July 7, 2011

Installing and configuring ADRMS in MOSS 2007

  Installing and configuring ADRMS in MOSS on windows server 2008 OS
Installation of AD RMS (Active Directory Rights Management Services) can be performed using the Server Manager utility, by adding the AD RMS role to the server:

1. Open Server Manager (To open, click on Start and then Control Panel and then Administrative Tools and then Server Manager).

2. In the Nodes pane, select Roles and then click the Add Roles link in the tasks pane.

3. Click Next at the welcome page.

4. On the Select Server Roles page, check the box for Active Directory Rights Management Services. If prompted to add additional services and features such as IIS or the Message Queuing Service, choose to add the Required Role Services and then click Next to continue.

5. Review the Introduction page, and click Next to continue.

6. On the Select Role Services page, select which components to install. In this case, only the core AD RMS role service is installed. Click Next to continue.

7. On the AD RMS Cluster page, choose to Create a New AD RMS Cluster and then click Next to continue.

8. On the Select Configuration Database page, choose whether to install the limited Windows Internal Database service (not recommended) or to create an RMS database on a separate server running SQL Server 200x.

9. On the Specify Service Account page, choose which service account will be used for RMS (Rights Management Services) by using the Specify button. It cannot be the same account that is used to install AD RMS.

10. On the subsequent page, select Use AD RMS Centrally Managed Key Storage and then click Next.

11. Enter a strong password when prompted, and click Next to continue.

12. Confirm which IIS website (Default Web Site for a dedicated build) will hold the AD RMS web services, and click Next to continue.

13. Type in the FQDN (Fully Qualified Domain Name) that will be used for the AD RMS service. For this example, enter rms.companyabc.com, and then click the Validate button. The FQDN must already be set up to resolve to the IP address of the IIS website on the RMS server. Click Next to continue.

NOTE: Using an SSL certificate for an HTTPS connection to the RMS server is recommended, and can be enabled from this wizard.

14. Enter a descriptive name for the RMS cluster, and click Next to continue.

15. On the AD RMS Service Connection Point Registration page, click Next to register the Service Connection Point (SCP) in AD DS.

16. If installing IIS at the same time, accept the defaults for setup by clicking Next, and then clicking Next again.

17. Click Install to finalize the installation wizard. It may take some time for the installation to complete.

18. Click Finish when the wizard is complete. Restart the server and log back on to complete the install.


Configure IRM on MOSS server:
                                                        Go to the Central admin site -> Operation - > Information Rights Management ->Select “Use the default RMS server specified in Active Directory” ->Click OK.


Check the IRM functionality working on SharePoint site:

1.       Open the SharePoint site -> select the shared document where do you want enable IRM->go to the document library settings ->information rights management->Enable “ Restrict permission to documents in this library on download” and give the policy name and description and Click Ok.
2.       Upload the word document to the Enable IRM document library
3.       Download the uploaded document from the document library
4.       When opening the document, it should show that the document protected.

5.       You could not make the print of the document as well.


NOTE:
1.        IRM protector is not available in windows SharePoint services and Foundation 2010 in out of box but we could use custom IRM protector on both.
2.       IRM protector available in SharePoint server’s edition in out of box.

Thursday, June 23, 2011

Login failed:The login is from an untrusted domain

I have received the following error message "ERROR “Unknown SQL Exception 18452 occured. Additional error information from SQL Server is included below. Login failed. The login is from an untrusted domain and cannot be used with Windows authentication.” in Event Viewer when sharepoint server trying to connect SQL server.

        
Cause:
           This issue because of connectivity issue between AD and SQL server.
 
Resolution:
               
1. check the time zone and date and time between AD and SQL server, if any changes, please correct it and restart the client machine
2.Still if you face the issue, run the following command on client machine
gpudpate /force
gpupdate /sync
 
3. Still if you face the issue, rejoin the SQL machine in th domain(in my case, i have rejoin the domain)


Failed to start the database service mssql$microsoft##SSEE

I was install WSS 3.0 with standalone mode which will installed SQL Embeded Edition by default. When i was trying to running sharepoint configuration wizard, I was received the following Error message "failed to start the database service mssql$microsoft##SSEE.Repair this product by selecting it from the add/remove programs menu"


Cause:
            By Default Network Service account is the Startup service account for SQL Embeded Edition but Network service Account does not have permission in SQL Embeded installation location(C:\windows\SYSMI) and .Net Framework 2.0 location.

Resolution:
                 Give the permission of  SQL Embeded installation  path and .net Framework 2.0 Path for Network Service Account.


TF14091: you cannot perform this operation on workspace

I got the following Error message, " TF14091: you cannot perform this operation on workspace " because you are not the owner of the workspace" and it  takes old login credentials but we login the current login details. when trying to open TFS project in vistual studio 2010.


Cause:
           Visual studio caches the credential details. so It tooks old credential for the login
Solution:
             For removing the credentil cache file, run the below mentioned command on visual studio command prompt.
tf workspaces /remove:*

IIS Admin Service service terminated due to speficified not found

I was not able browse any site in the local machine and finally found that IIS admin Service is stopped.
I have tried to start the IIS admin service but I have received the following Error Message.
"IIS Admin Service service terminated due to speficified not found". 

Cause:
             For starting IIS admin service required two XML files such Metabase.XML and MBSchema.XML. If any one of the files missed or crashed, the IIS admin service wont be start.
 
Solution:
              In my case metabase.xml file missed in the following location C:\Windows\System32\Inetsrv. So I have restored metabase.xml file from the following location C:\Windows\System32\Inetsrv\History.

The server encryption keys could not be accessed. Event ID 6208

I have received the following error message when trying to open the User profile service application using Central Admin site in sharepoint 2010  "The server encryption keys could not be accessed.
User Action
Verify that the service account has permissions to the following registry key:
HKEY_LOCAL_MACHINE\SOFTWARE\Microsoft\Forefront Identity Manager\2010\Synchronization Service
If the problem persists, run setup and restore the encryption keys from backup."

Event ID 6208


Cause:
           This issue because of most of the cases when changing the configured service account to other Account and may be removed the service account from the SQL.

Resolution:
1. check the your changed service account
2. then check the changed service account has the permission in the user profile Database
3.Then Stop user profile synchronization service and Start the User profile synchronization service
4. Make sure forefront services are started and User profile synchronization service is started.
5. Now User profile service application should open.


Monday, June 13, 2011

Move Sharepoint server from Domain to another domain

Move/migrate Sharepoint server  from one domain to another domain
Example: Move sharepont fron mumbai domain to chennai domain.
1.       We have to take the backup of all sharepoint databases and all webconfig and if we have any customization.
2.       Need to take the list of web application pool identity Accounts details.
3.       Now Remove the mumbai domain and join to new domain chennai.com
4.       Create the sharepoint account and add that sharepoint Account to the below groups in the sharepoint machine.
Local administrators,WSS_WPG,WSS_admin and IIS_WPG

5.       Now we need to do 3rd step in SQL machine and add the sharepoint Account in local administrator group and  Open the sql management studio and do the following steps
5a. create a new login for sharepoint account and assign the following roles DB creater and security Admin.
               5b.  Give the DB owner permission for the sharepoint account  for all sharepoint DB using user Mapping option in the user Account property.
6.       Now login to the sharepoint server using sharepoint Account and run the following stsadm commands
6a. stsadm.exe –o updatefarmcredentials –userlogin chennai\testspuser –password test@123
6b. stsadm.exe –o updateaccountpassword –userlogin chennai\testspuser –password test@123 -noadmin
6c. stsadm.exe –o spsearch –farmserviceaccount chennai\testspuser –farmservicepassword test@123
6d. stsadm.exe – o osearch –farmserviceaccount chennai\testspuser –farmservicepassword test@123
6e. the below command for SSP
      Stsadm.exe –o editssp –title SSPname –ssplogin chennai\testspuser –ssppassword test@123
Finally restart IIS with noforce

7.       Check that central admin pool and Sharepoint service account are changed using IIS and Service manager.

8.       Now open the central admin and change the all web application pool account and change the site collection administrator credentails

9.       Then migrate the old  domain users to new domain account using the below stsadm command
9a.stsadm.exe –o migrateusers –oldlogin mumbai\testuser –newlogin chennai\testuser -ignoresidhistory

Friday, March 25, 2011

Login your domain to another domain of sharepoint site

one of my friend  asked me one question that was it possible to access the External domain sharepoint site using his domain credentials?

Resolution:
                    I have said that it was possible to access another domain sharepoint site from one domain credentials using the below steps

1. create the Forest Trust between both domain in the AD server.
2. once you succeeded the domain trust, go to the sharepoint site and add the External domain users account in the site.
3. Once you added the External domain user account, now it should be access the sharepoint site.

Not able to create document library for upgraded SP site

Not able to creating the document library in migrated sharepoint foundation 2010 site and we got the below error message in the Log file

“Cannot complete this action.  Please try again.    at Microsoft.SharePoint.Library.SPRequestInternalClass.GetSchemaXML(String bstrUrl, String bstrListName, UInt32 sch, Boolean bOnlyViewAttributes, Boolean bExtendedFieldsProperties, Boolean bNeedInitAll, ISPDataCallback pXMLCallback)     at Microsoft.SharePoint.Library.SPRequest.GetSchemaXML(String bstrUrl, String bstrListName, UInt32 sch, Boolean bOnlyViewAttributes, Boolean bExtendedFieldsProperties, Boolean bNeedInitAll, ISPDataCallback pXMLCallback)                53b2842c-67d3-4b87-a095-58d366880335”


Resolution:
                      The above Error message because of some customization site definition is not installed in the sharepoint foundation 2010 Machine. So we have to find out the which site definition file is missing and move that site template file and XML file to sharepoint foundation machine from WSS.


Failed determine the setup path of the list schema for feature

I have upgraded one of my  Moss site to sharepoint 2010 using Detach and Attach Method. when opening the document library in one of the subsite, i got the below Error message in the Sharepoint Log file.
"Failed to determine the setup path of the list schema for feature {525DC00C-0745-47C0-8073-221C2EC22F0F}, list template 101.
System.ArgumentException: Feature '525dc00c-0745-47c0-8073-221c2ec22f0f' for list template '101' is not installed in this farm. 
The operation could not be completed.   "

Resolutions:
1.       The cause above Error is some features are missing. So we have to find out the which feature is missing and copy that missing feature from WSS and move that feature files to SharePoint foundation 2010.

For finding the feature please use the below link which is very useful.

2.       Then we have to activate that feature in the sharepoint server 2010 using below Stsadm command.
STSADM.EXE  -O INSTALLFEATURE  -NAME <GIVE THE NAME OF THE FEATURE)

In mycase 4 feature are missing and I have moved those features and I run the stsadm commands.

Stsadm.exe  -o installfeature  -name pwdoclibs

3.       Finally Reset the IIS.
 

Monday, February 28, 2011

BPOS Email coexistance with third party Email hosting provider

I wish to split up my organization such that half of the companies users use Microsoft BPOS - Exchange Online and the other half remain with the current 3rd party email hosting provider(in my case, we are using google apps).  The reason is because the client's number of workers fluctuate a lot; having to sign up for a BPOS license for an entire year does not make economic sense.
For instance, on BPOS the following users would have email accounts;
TestUser1@aurramu.com
TestUser2@aurramu.com
TestUser3@aurramu.com


On the third party email acount provider, there would be email accounts for TestUser4@aurramu.com
TestUser5@aurramu.com
TestUser6@aurramu.com

I have followed the below steps.

1. Register a New domain and add a alias in the third party email hosting control panel(i have added alias domain in the google apps for existing domain, domain alis name tempalis.com).
2. Verify Domain and Enable External Relay in the BPOS.
3. Create a BPOS user Accounts such as testuser1@aurramu.com etc. Now you have got the Two Email Address for the user such as testuser1@aurramu.com and testuser1@aurramu.microsoftonline.com
4. Now create the Email Groups as same as BPOS user Email address and add member of the group of alias Email address(in my case  in google apps, created a testuser1@aurramu.com group and added the alias email address as a member in the group(testuser1@aurramu.microsoftonline.com).
5. Then Create a contact for the domain alias email address of the existing google apps email address( in my case, i have create a contact called testuser4@temaplis.com in the BPOS and the same in other users)
6. create the distribution list for the google apps user account and add the member from the appropriate user account from the contact(in my case, i created a distrubution list called testuuser4@aurramu.com and added member of testuser4@tempalis.com contact).

Now its working for me.

FYI:  For the External could not view the Alias Email Address for the user Account. They could view the Domain Email address only.


EVENT ID 6875 FOR SHAREPOINT WORKFLOW

I have created the approval workflow in sharepoint site but the workflow was not getting started and I got the following Error message in the Event viewer.

Application Event:

Event Type:        Error
Event Source:        Windows SharePoint Services 3
Event Category:        General
Event ID:        6875
Date:                2/10/2011
Time:                4:36:25 PM
User:                N/A
Computer:        DJ
Description:
Error loading and running event receiver Microsoft.SharePoint.Workflow.SPWorkflowAutostartEventReceiver in Microsoft.SharePoint, Version=12.0.0.0, Culture=neutral, PublicKeyToken=71e9bce111e9429c. Additional information is below.

: The Web application at http://test/general/vacations/peabody could not be found. Verify that you have typed the URL correctly. If the URL should be serving existing content, the system administrator may need to add a new request URL mapping to the intended application.

For more information, see Help and Support Center at http://go.microsoft.com/fwlink/events.asp."


RESOLUTION:
                        I Found the cause for my case that we have changed default zone url from http://test/ to http://aurramu.blogspot.com/ in the Central Admin. So the workflow not able to recognize the host name URL(http://test/ ).  So I have added the host header in the IIS(added host header value of  aurramu.blogspot.com in IIS), Host name in the Host file and Disable the Loop Back check on the sharepoint. Now the workflow is working very well.


ALERTS NOT WORKING IN MOSS/WSS

"I have created the alert in my moss site and I received the First Initial Alert Notification Mail After that I have not received Any mails from the Library if any changes on it".
I have done the following steps for fixing this issue.

1. Confirm the account running the SharePoint Timer service is the account which has the administrator Full Control permission over the site and the full permission over the content database. If Not provide the permission in the site and the content DB of the site.

2. Confirm your site has the correct default zone URL and the URL is working perfectly(because in my case, i have changed my default zone url from http://test/ to http://aurramu.blogspot.com/ in the central Admin after that the sharepoint not able to recognize the new url due to hostheader and not added in the host name  in the host file)

3.Then Run the folllowing stsadm Commands.
   3a. stsadm.exe -o setproperty -url http://aurramu.blogspot.com/ -pn alerts-enabled -pv true
   3b. stsadm.exe -o setproperty -url http://aurramu.blogspot.com/ -pn job-immediate-alerts

Now the Alert should be work.


Monday, February 21, 2011

EventID 3698/User profile synchronization not started

I am trying to start the user profile synchronization service on my sharepoint server 2010 machine  but it was not started and i got the following Error message in the Event Viewer.

"The Execute method of job definition Microsoft.Office.Server.Administration.ProfileSynchronizationSetupJob (ID 0ea2f9be-85d7-4d7d-8be6-bb2462f01e09) threw an exception. More information is included below.
An update conflict has occurred, and you must re-try this action. The object UserProfileApplication Name=User Profile Service Application was updated by aramu\WSSadmin, in the OWSTIMER (1816) process, on machine APP03.  View the tracing log for more information about the conflict."


So I followed the below Methods.
Method
1. Check your Firewall has opened the Forefront Identity Service port are opened and able to Access the Database. or Disable your Firewall
2. Then restart the Timer Job service, restart the IIS and finally start the User profile Synchronization service

Method2:
1. Check your Service account has incluede Local Admin group and that user account has should local profile(should be logged on the sharepoint machine)
2. once you done, restart the timer job service, restart the IIS and finally the start the user profile synchronization service

Method3:
1. Disable the LoopbackCheck on the sharepoint server machine and restart the machine.

For my case I have done method1 and mehtod2, it was worked.


Wednesday, February 16, 2011

Enable Incoming Email in sharepoint with BPOS

Hereby I have followed below steps "Integrating/configuring Incoming Email settings in sharepoint with BPOS Exchange Mail".

Scenerio:
                I have the Email in Microsoft BPOS but I have not synchronized in Local AD server with BPOS.          
Email Account domain name:aramu.com
My Local AD server name: test.com
Local SMTP server: sharepoint.test.com
Sharepoint server name: sharepoint.test.com

If any send mailin@aramu.com domain should store in the my local sharepoint site document library. in my case it is not possible to happen directly, so What i done was that i have created the distribution list called mailin@aramu.com and redirected to the local sharepoint SMTP server which i published for external access using mailin@demo.aramu.com email address.


For my Scenerio, i have followed the below steps.

1. Install and configure SMTP service:
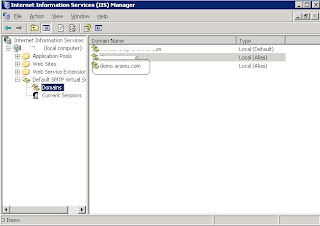
                                                           Install SMTP service on local sharepoint Machine and create the Alias as per your email address(in my case i have created demo.aramu.com) and create the subdomain and Enable this SMTP for External Access(in my case, i have registered demo.aramu.com and Enabled the local smtp server for the external access) and dont forget to enable "SMTP Drop box"


2. configuring Incoming Email setting in sharepoint and Sharepoint site document library:
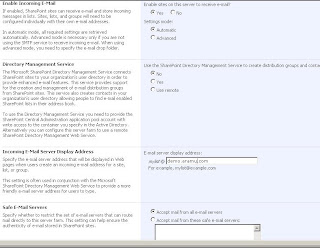
     2a. Go to central admin and Open the "Incoming Email settings"  enable email settings is Yes and SElect No in " use the sharepoint directory" and in the Email Address display name Give the subdomain name (in my case demo.aramu.com).


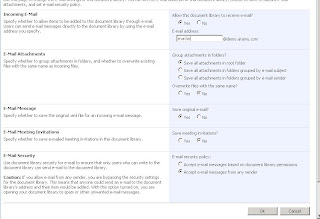
2b. go to the sharepoint site and select the document library which you want to configure and give the Email Address(in my I have used mailin@demo.aramu.com).


3. Create distribution list and contact in BPOS Admin page.
    3a. create the distrtibution list for which email you want to redirect to sharepoint library.(in my case, i have create mailin@aramu.com)
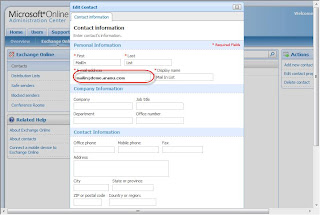
3b. create the New contanct and add the member of the distribution list(in my case, i have created mailin@demo.aramu.com).


Now the Email should redirected to the local sharepoint site.


I have refered the below link for Incoming Email Settings. the below blogs also help you too.
http://blogs.msdn.com/b/selvagan/archive/2008/01/26/incoming-email-configuration-moss.aspx
http://whitepages.sfintelligence.com/2010/10/integrating-sharepoint-on-premises-with-bpos-and-exchange-online-part-2-inbound/


Tuesday, February 15, 2011

RESET SHAREPOINT PASSPHRASE

If you forget your passphrase after installation of sharepoint 2010 long time. You could "reset/Change/retrieve your passphrase in sharepoint 2010" using the following powershell commands.


1. C:\PS>$passphrase = ConvertTo-SecureString -asPlainText -Force
2. C:\PS>Set-SPPassPhrase -PassPhrase $passphrase -Confirm


Tuesday, February 8, 2011

The site collection could not be restored

I have received the following error message while restoring the Site collection backup file in new sharepoint 2007 environment.

"The site collection could not be restored. If this problem persists, please make
 sure the content databases are available and have sufficient free space."


So i have done the following methods and restored the backup file successfully.

Resolutions:
1. Stop and restart the "Windows Sharepoint service Timer" and restart the IIS.
2. Open the SQL managment studio and select the properties of the sql server and select " connections" and uncheck “Use query governor to prevent long-running queries”. Also, set “Remote query timeout” to 0.

Finally restore the backup file. now it should be restored successfully.


Saturday, February 5, 2011

HTTP Error 401.Resource require user authentication

If you got the below error message for your Kerberos authentication sharepoint site using "user mode" and "Kernal mode" in IIS follow the below solution method.

“HTTP Error 401. The requested resource requires user authentication.”

Resolution:
Disable the kernel mode authentication in IIS7 by clicking Advanced Settings of the web site in IIS.


Friday, February 4, 2011

MOSS MA not found in Sharepoint 2010

Scenerio:
              In my case, I have already created the AD sync connection in the Sharepoint User profile service Connection page but the connection was not available after few days. So I was trying to create the new connection, while creating i got the below Error message("MOSS MA not found")

image

If you got the same above error message, please follow the below solutions

Solution 1:
First this solution Method. if it does not work, try the Solution 2 method.

a. Go to the Service.msc and check and confirm the Forefront Identity Manager Services are running, if not please start the both the services.
image
Now the issue will be goes away. if not try the solution 2 method.

Solution 2:
a. Go the Services on Servers in the sharepoint Central admin and now stop the user profile synchronization service.
b. and then Restart the User profile synchronization service.
This time the Issue should be fixed.

I have refered the the below blog site
http://www.khamis.net/blog/default.aspx


SQL Database stats Shutdown,Normal

If you got your "database status is shutdown, normal mode".
Run the below query for reset the database status to Normal mode.

ALTER DATABASE <yourDB> SET AUTO_CLOSE OFF

Now the database should be Normal mode.


Wednesday, February 2, 2011

Visual Upgrade failed.Master page not found

If you got the below error message while running visual upgrade, please follow any one of the solution method

"Visual Upgrade failed. The default master page for this user interface could not be found at "/_catalogs/masterpage/v4.master". Add the requested master page at this path and try again.
Correlation ID: 14e48dbb-eabd-4752-b1cf-82c4a6ddafc9 "

Cause:
           This error message because of the not able to find the v4 master page.
So please any one of the mehtod

Solution 1:
1 create the subsite in the upgraded site and download the v4. master page from this site master page gallery
2. Upload this v4 master page to root site master page gallery.
3. then re do the visual upgrade
4. Now it should upgraded with out error.
if you tried this method, you have to redo this steps all the subsites in the site collection

Solution 2:
1. Remove  the Website with  sql database  to start over again from my old WSS 3.0 Databases.
2)  then Recreat a new webapp and redetach the content database
4) Run the Mount-SPContentDatabase with the "UpdateUserExperience" parameter.


Monday, January 31, 2011

Disable/Block Sharepoint Designer 2010


For "disabling SharePoint Designer in 2010" complete the following steps:
  1. Open Central Administration 
  2. Select Application Management 
  3. Select "Manage Web Applications" 
  4. Select the desired Web Application for which you want SharePoint Designer disabled, then Under "General Settings" select "SharePoint Designer" as seen below:


Uncheck Sharepoint designer and Click "OK" to save your changes and SharePoint Designer is now blocked/disabled for the Web Application.

Report server instance not configured correctly


If you get the above print screen error message while you configuring Reporting service URL in your sharepoint Central Admin page.
The following Cause might be happen,
1. Your Existing SQL server Reporting Database is not Sharepoint Integrated Mode
2. SQL Reporting Service was running under sqluser@domain.com
So verify your SQL server Reporting Service Mode and service Account.

Solutions:
1. if your SQL is not integreted with Sharepoint please follow the below steps

Go to Reporting Services Configuration Manager > Connect to the SSRS Instance on APPSEREVER > Click ON Database > Change Database > Create new reporting server database, next > SharePoint Integrated Mode, next > Accept the Service Credentials, or enter the correct one > Next, Next Finish..
Finally restart the SQL reporting service.

2. if your sql reporting service running under username@domain.com, follow the below steps.
Go to Reporting service configuration manager > Connect to the SSRS instance on appserver->Click on Service Account-> Click another Account and change to Domainname\sqluser and provide password


Saturday, January 29, 2011

Enable Mixed Mode Authentication in SQL


For "enable mixed mode authentication", please follow these steps:

  1. Log into your server through Remote Desktop Connection (instructions for connecting to your server through RDC can be found here).
  2. Click StartProgramsMicrosoft SQL Server 2005/2008/2008R2 and select SQL Server Management Studio Express or SQL Server Management Studio, depending on your version of SQL Server.
  3. Enter the requested information:
    • Server Type: select Database Engine
    • Server Name: this field should be populated by default
    • Authentication: select Windows Authentication
  4. Click Connect.
  5. Right click the server name and select Properties.
  6. Click Security.
  7. Under Server authentication select SQL Server and Windows Authentication Mode.
  8. Click OK.
  9. Right click the server name and select Restart. Wait a few moments for the service to restart before proceeding.

Install sharepoint in SQL authentication method

Below steps for "Installing sharepoint 2010 in SQL authentication"
  1. Configure SQL Server to use mixed authentication. You can configure SQL Server to used mixed authentication when you install SQL Server. For information about how to change the authentication mode after you install SQL Server, visit the following Microsoft Web site:
  2. Add a new SQL Server account in Microsoft SQL Server 2005. Then, grant the roles of security administrator and database creator to the account. To do this, follow these steps:
    1. Click Start, point to All Programs, point to Microsoft SQL Server 2005, and then click SQL Server Management Studio.
    2. In SQL Server Management Studio, expand Security, right-click Logins, and then click New Login.
    3. In the Login - New dialog box, type the name of the SQL Server account, clickSQL Server Authentication, type the password, and then click Server Roles.
    4. In the results pane, click to select the following check boxes, and then click OK:
      • dbcreator
      • securityadmin
  3. In the domain in which the server that is running SharePoint Server resides, create new domain accounts for the SharePoint Server service account and for the SharePoint Server Application Pool account. To do this, follow these steps:
    1. Click Start, point to Administrative Tools, and then click Active Directory Users and Computers.
    2. In the Active Directory Users and Computers snap-in, right-click Users, point toNew, and then click User.
    3. In the New Object - User dialog box, type the account name that you want to use for the SharePoint Server service domain account, and then click Next.
    4. Type the password two times.
    5. Click to clear the User must change password at next logon check box, click to select the Password never expires check box, click Next, and then clickFinish.
    6. Repeat steps 3b to 3f to create the SharePoint Server Application Pool account.
  4. Install SharePoint Server 2010. However, do not select the stand-alone installation. After SharePoint Server 2010 is installed, click Cancel when you are prompted to run theSharePoint Products and Technologies Configuration Wizard.
  5. Log on to the server that is running SharePoint Server 2010, click Start, click Run, typecmd in the Open box, and then click OK.
Run the below stsadm command

once you run the command, you finished the creating central admin and farm

The Central Admin path is set automatically on Port: 14370 (in my case), but not deployed on IIS Server. (check IIS Manager and you will see no central admin is deployed, the Farm is also only created on WSS v4 level because the SharePoint Server Features are not installed & deployed)
To provision the central admin on IIS you can execute:  psconfig –cmd adminvs -provision
Now check your IIS and you will see the central admin web application:
clip_image017
clip_image019

Now while you browsing services/feature, you could find the some missed features, So Finally we have to Rerun the SharePoint Configuration wizard in the GUI Mode and then you will all the features.