Pages

Monday, January 31, 2011

Disable/Block Sharepoint Designer 2010


For "disabling SharePoint Designer in 2010" complete the following steps:
  1. Open Central Administration 
  2. Select Application Management 
  3. Select "Manage Web Applications" 
  4. Select the desired Web Application for which you want SharePoint Designer disabled, then Under "General Settings" select "SharePoint Designer" as seen below:


Uncheck Sharepoint designer and Click "OK" to save your changes and SharePoint Designer is now blocked/disabled for the Web Application.

Report server instance not configured correctly


If you get the above print screen error message while you configuring Reporting service URL in your sharepoint Central Admin page.
The following Cause might be happen,
1. Your Existing SQL server Reporting Database is not Sharepoint Integrated Mode
2. SQL Reporting Service was running under sqluser@domain.com
So verify your SQL server Reporting Service Mode and service Account.

Solutions:
1. if your SQL is not integreted with Sharepoint please follow the below steps

Go to Reporting Services Configuration Manager > Connect to the SSRS Instance on APPSEREVER > Click ON Database > Change Database > Create new reporting server database, next > SharePoint Integrated Mode, next > Accept the Service Credentials, or enter the correct one > Next, Next Finish..
Finally restart the SQL reporting service.

2. if your sql reporting service running under username@domain.com, follow the below steps.
Go to Reporting service configuration manager > Connect to the SSRS instance on appserver->Click on Service Account-> Click another Account and change to Domainname\sqluser and provide password


Saturday, January 29, 2011

Enable Mixed Mode Authentication in SQL


For "enable mixed mode authentication", please follow these steps:

  1. Log into your server through Remote Desktop Connection (instructions for connecting to your server through RDC can be found here).
  2. Click StartProgramsMicrosoft SQL Server 2005/2008/2008R2 and select SQL Server Management Studio Express or SQL Server Management Studio, depending on your version of SQL Server.
  3. Enter the requested information:
    • Server Type: select Database Engine
    • Server Name: this field should be populated by default
    • Authentication: select Windows Authentication
  4. Click Connect.
  5. Right click the server name and select Properties.
  6. Click Security.
  7. Under Server authentication select SQL Server and Windows Authentication Mode.
  8. Click OK.
  9. Right click the server name and select Restart. Wait a few moments for the service to restart before proceeding.

Install sharepoint in SQL authentication method

Below steps for "Installing sharepoint 2010 in SQL authentication"
  1. Configure SQL Server to use mixed authentication. You can configure SQL Server to used mixed authentication when you install SQL Server. For information about how to change the authentication mode after you install SQL Server, visit the following Microsoft Web site:
  2. Add a new SQL Server account in Microsoft SQL Server 2005. Then, grant the roles of security administrator and database creator to the account. To do this, follow these steps:
    1. Click Start, point to All Programs, point to Microsoft SQL Server 2005, and then click SQL Server Management Studio.
    2. In SQL Server Management Studio, expand Security, right-click Logins, and then click New Login.
    3. In the Login - New dialog box, type the name of the SQL Server account, clickSQL Server Authentication, type the password, and then click Server Roles.
    4. In the results pane, click to select the following check boxes, and then click OK:
      • dbcreator
      • securityadmin
  3. In the domain in which the server that is running SharePoint Server resides, create new domain accounts for the SharePoint Server service account and for the SharePoint Server Application Pool account. To do this, follow these steps:
    1. Click Start, point to Administrative Tools, and then click Active Directory Users and Computers.
    2. In the Active Directory Users and Computers snap-in, right-click Users, point toNew, and then click User.
    3. In the New Object - User dialog box, type the account name that you want to use for the SharePoint Server service domain account, and then click Next.
    4. Type the password two times.
    5. Click to clear the User must change password at next logon check box, click to select the Password never expires check box, click Next, and then clickFinish.
    6. Repeat steps 3b to 3f to create the SharePoint Server Application Pool account.
  4. Install SharePoint Server 2010. However, do not select the stand-alone installation. After SharePoint Server 2010 is installed, click Cancel when you are prompted to run theSharePoint Products and Technologies Configuration Wizard.
  5. Log on to the server that is running SharePoint Server 2010, click Start, click Run, typecmd in the Open box, and then click OK.
Run the below stsadm command

once you run the command, you finished the creating central admin and farm

The Central Admin path is set automatically on Port: 14370 (in my case), but not deployed on IIS Server. (check IIS Manager and you will see no central admin is deployed, the Farm is also only created on WSS v4 level because the SharePoint Server Features are not installed & deployed)
To provision the central admin on IIS you can execute:  psconfig –cmd adminvs -provision
Now check your IIS and you will see the central admin web application:
clip_image017
clip_image019

Now while you browsing services/feature, you could find the some missed features, So Finally we have to Rerun the SharePoint Configuration wizard in the GUI Mode and then you will all the features.


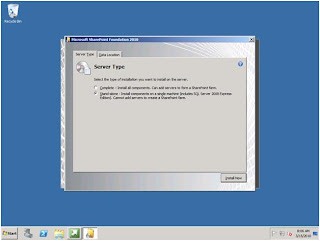
Installing Sharepoint Foundation 2010 Without AD

we could install "sharepoint server/ Foundation 2010 on the Local Machine using Local User Account using Standalone Method".

 First install the prerequisite software and proceed the installation using standalone, the print screen is below for your Reference.


Taxonomy feature has not been activated

If you got the below error Message while trying to create a Managed Metadata column in your list  in the particular site collection.


Solution:
Run the below powershell command in the sharepoint server 2010.
Enable-SPFeature -Identity 73EF14B1-13A9-416b-A9B5-ECECA2B0604C -Url <URL to your Site Collection>
Example:
Enable-SPFeature -Identity 73EF14B1-13A9-416b-A9B5-ECECA2B0604C -Url http://aurramu.blogspot.com/


Event ID 5555/ Failure trying to synch user profile

If you got the below Event ID 5555 in the event viewer for your sharepoint User profile web application follow solution steps.
Solutions:
Run the stsadm command
stsadm -o sync -DeleteOldDatabases 0

Finally start the full user profile sync for the sharepoint User profile.


Remove System Account user in Workflow Group

when you running workflows, the system Account automatically included in the Sharepoint Workflow Groups but  you were not added the system account in the groups. So for removing the system account in the workflow run the stsadm commands.

stsadm -o deleteuser   -url    -userlogin sharepoint\system   -group  groupname

Example:
stsadm.exe -o deleteuser -url http://aurramu.blogspot.com/ -userlogin sharepoint\system Account  -group testworkflowowner


Backup/Restore sharepoint powershell/stsadm cmds

Backup the sharepoint site collection using below powershell command

backup-spsite -identity <url> -path <give the path>
Example:
backup-spsite -identity http://aurramu.blogspot.com/ -path D:\test.dat

Backup the sharepoint site collection using below stsadm command

stsadm.exe -o backup -url <url> -filename <give the path>
Example:
stsadm.exe -o backup -url http://aurramu.blogspot.com/ -filename D:\test.dat

Restore the sharepoint using the below powershell commands

restore-spsite -identity <url> -path <give the path>
Example:
restore-spsite -identity http://aurramu.blogspot.com/ -path D:\test.dat  -force
NOTE: if you want to overwrite existing site collection use -force

Restore the sharepoint using the below stsadm commands

stsadm.exe -o restore -url <url> -filename <give the path> -overwrite
Example:
stsadm.exe -o restore -url http://aurramu.blogspot.com/ -filename D:\test.dat -overwrite

Thursday, January 27, 2011

Clone SharePoint from Development to Production

Some of the people have question that was it possible to make SharePoint development Farm to SharePoint production Farm using clone/hyper/virtual?

Yes, of course. we could make this possible using the below steps.

1. First take a clone of those SharePoint server farms.
2.Then take offline of the Development Machine and rename and change the IP address of those Clone SharePoint server farm.
3. once done the changed the machine name and IP, up the development SharePoint server farm.
4. then make the clone SharePoint server to use their own machine name for the URL and SQL server.

For More information and help, please post a comment.


Microsoft##SSEE not accessible in wss

Recently we tried installing the July 2010 update for WSS on our server that hosted several of our client’s Sharepoint sites. The update didn’t complete successfully and to our horror we found none of or client Sharepoint sites were working. Windows Event Log and Sharepoint Log reveled the below error
“The database on server_name\Microsoft##SSEE is not accessible to missing Windows Internal Database signatures”
We checked the database, service accounts, restarted Sharepoint services but nothing resulted in success.After several hours of breaking our heads and web searching we found out that the issue was because the websites were not provisioned successfully(more info on Microsoft support). The steps given in the MS kb article provided us the initial lead and then we figured out the remaining pieces.
Below are the steps to be followed for fixing Microsoft##SSEE is not accessible Issue
1. Stop SP web service with below command
stsadm -o provisionservice -action stop -servicetype spwebservice -servicename ""
Note: You don't have to specify service name here. Just empty quotes would do.
2. Start the SP web service with the below command

stsadm -o provisionservice -action start -servicetype spwebservice -servicename ""

3. Run the PSConfig command with the below parameters
psconfig -cmd upgrade -inplace b2b -wait -force
4. Restart all Sharepoint services
5. Restart IIS
This would bring back all Sharepoint sites to life. However the following this have to be handled
1. Any changes done to web.config files would not be preserved so these changes have to be applied again.
2. Bin directory of SharePoint sites will be cleaned. So any custom components that were placed here has to be placed again.
3. IIS settings would have been overridden. They have to be applied again.

How to Improve performance of SharePoint Sites

Faster loading websites are need of the day as even a minor delay in the website response could cause frustration on the visitors part. Faster websites lead to happy users which in turn lead to increased business. A study by Google reveals that visitors spend less time in websites that are slow.
With our experience in building internet websites with Sharepoint we have acquired knowledge of several techniques that will greatly improving the website performance. Some of the techniques are listed below
1. Setup compression at web server level
2. Setup caching at web server level
3. Remove Core.js and other scripts that are used internally Sharepoint but required for anonymous users
4. Remove unwanted styles and markups from Sharepoint master page
5. Remove unwanted images
6. Minify Java script files and style sheets
7. Use CSS sprites
8. Remove unwanted web parts
After applying the performance enhancement techniques the speed of Sharepoint internet websites have increased drastically.

Event id 5555/User Profile synch not working

If the user profile is not synchronizing after you changed the property of the user property on SSP and if you found the following error message in your event log
then follow the following solution steps.
Solution Steps:
open the command prompt and run the following command.
stsadm -o sync -DeleteOldDatabases 0
then it removing the old data.
Now it should work properly

Event Id 2436 Access denied in moss search

If you are getting the below error in event log in your SharePoint server 2007
"Access is denied. Check that the Default Content Access Account has access to this content, or add a crawl rule to crawl this content."
clip_image002[4]
Then follow the below solution steps
Method 1: Disable the loopback check
1.    Click Start, click Run, type regedit, and then click OK.
2.    In Registry Editor, locate and then click the following registry key:
HKEY_LOCAL_MACHINE\SYSTEM\CurrentControlSet\Control\Lsa
3.    Right-click Lsa, point to New, and then click DWORD Value.
4.    Type DisableLoopbackCheck, and then press ENTER.
5.    Right-click DisableLoopbackCheck, and then click Modify.
6.    In the Value data box, type 1, and then click OK.
7.    Quit Registry Editor, and then restart your computer.
Method 2:- After I restarted the server I went to the Sharepoint Admin site and started a full crawl. Some seconds later I went to the crawl log and found a warning this time with the following entry:
Content for this URL is excluded by the server because a no-index attribute.
So  "Reset All Crawled Content" and tried the full crawl again.
Now it should work.

Move sharepoint site one domain to another

Scenerio:
I am having two separate domains in Mumbai and Chennai called Mumbai as Mumbai.com and Chennai as Chennai.com. Both domains are running SharePoint server 2007 with different domain.
I am planning to move Mumbai SharePoint server 2007 site to Chennai SharePoint server 2007.
For this scenario, you can do the following steps to move SharePoint site from domain to another.
NOTE: SharePoint version should be same, mean if you installed service pack on source machine (Mumbai SharePoint server) at the same, you should install service pack on destination server (Chennai SharePoint server)
You can check the version of SharePoint, open SharePoint central administration->site setting, you can view the version.
Steps to be following:
Source SharePoint server (Mumbai SharePoint server):
1.       Take back of the SharePoint site which you required to move using stsadm.exe command utility.
Stsadm.exe –o backup –url http://mumbai/ -filename c:\mumbai.bak
2.       Move the backed up file to destination SharePoint server.
Destination SharePoint server (Chennai SharePoint server):
      1.       Create new SharePoint web application on SharePoint server
2.       Create SharePoint site collection for the new web application.
Note: site collection template should be same as source SharePoint server. For example if you created team template on source SharePoint server, then you should create same team template in destination SharePoint server.
3.       Then you need to overwrite the database using stsadm command utility
Stsadm.exe –o restore –url http://chennai/ -filename c:\mumbai.bak –overwrite
4.       If you access the site immediately after restore, you will get the access denied error.
5.       Add a user via command line because the restored site will deny all of your login attempts (unless your server is on the same domain as the original source server – *** this post describes the steps for restoring to a different domain***)
Using the central administration console, you will note that the site collection still references the original administrators which are now invalid on this new domain (Chennai domain SharePoint).
NOTE: you can view using following steps >> Central Administration >> Application Management >> Site Collection Administrators (on Chennai SharePoint central administration domain).
6.       Now you need to change ownership of the site collection using following command.
stsadm -o siteowner -url http://chennai/ -ownerlogin chennai\administrator
7.       Now if you refresh central admin console you will see the new administrator as an owner, you can change the secondary administrator at this point as well using same utility.
stsadm -o adduser -url http://localhost -userlogin administrator -useremail test@chenna.com -role administrator -username administrator
8.       Now reset the IIS and you can login the main site collection as a administrator.
9.       Then you can optionally run this to clean up the old lingering logins explicitly
                stsadm -o migrateuser -oldlogin olddomain\MossAdmin -newlogin newdomain\MossAdmin

Removing Link from People Name in Sharepoint List

Sharepoint lists can have special type of  column that refers to a person or group. When viewing the list data the person column will display the person name and picture with a  link to the page that displays the user details(userdisp.aspx). Sometimes it would be desirable to prevent users from viewing the user details.  This can be done by using few lines of Jquery script. Following steps explains the steps involved
1. Navigate to the Sharepoint page that displays the list with the people link
2. The people column will be displayed like the one shown below
Peoples column with link
3.  Add a content editor webpart to the page
4. Modify the content editor webpart and go to the source editor and add the below script
<script src="http://ajax.googleapis.com/ajax/libs/jquery/1.3/jquery.min.js" type="text/javascript"></script>  
<script>
$(document).ready(function () {
    $('a[href*=userdisp.aspx]').each(function(idx, item) { 
$(this).attr({href:location.href+"#",onClick:"return false;"})
var content = $(this).html();
$(this).parent().html(content)
    });
});    
</script>
5. Now the people column will be displayed like the one shown below
Peoples column without link

Could Not Connect to MICROSOFT##SSEE

If you get the following error message in SQL Management studio while accessing your SharePoint windows internal database, follow-up the solution steps
An error occurred while establishing a connection to the server. When
connecting to SQL Server 2005, this failure may be caused by the fact
that under the default settings, SQL Server does not allow remote
connections.
Solution steps:
1. open the SQL server configuration manager and right click the “ protocols for Microsoft##SSEE” under SQL server Network Configuration, Select properties then Change the “Hide Instance” status NO and click ok to close.
clip_image002
2. Confirmed the TCP Protocol is enabled and restart the SQL service instance.
3. Open the SQL server surface Area configuration, Click Surface configuration for Services and Connections and confirmed remote connection status to using TCP/IP protocols under the MICROSOFT##SSEE Instance.
clip_image004
4. Restart the Microsoft##SSEE instance service and now you can successfully access your SharePoint Database Instance.

SharePoint Warm up Scripts for WSS/MOSS

Normally all the Application Pools that get created are scheduled to reset themselves at a certain time usually around 1.45 AM in the morning. Therefore if you browse the web site for the time, it takes long time to load the web application but instead of using this script, it speed the web application.
So if you want this script, add the below code I have provided in a PS1 script and scheduled in windows scheduled task list. You can remove those app pool recycles that are scheduled
Save the following in a script named SharepointWarmUpscript.ps1 (1 is numeric value one).
Code:
iisreset
############################################################################
#Assumptions:
#-Running on machine with WSS/MOSS
#-C:\Program Files\Common Files\Microsoft Shared\web server extensions\12\BIN in path
############################################################################
function get-webpage([string]$url,[System.Net.NetworkCredential]$cred=$null)
{
$wc = new-object net.webclient
if($cred -eq $null)
{
$cred = [System.Net.CredentialCache]::DefaultCredentials;
}
$wc.credentials = $cred;
return $wc.DownloadString($url);
}
#This passes in the default credentials needed. If you need specific stuff you can use something else to
#elevate basically the permissions. Or run this task as a user that has a Policy above all the Web Applications
#with the correct permissions
$cred = [System.Net.CredentialCache]::DefaultCredentials;
#$cred = new-object System.Net.NetworkCredential("username","password","machinename")
[xml]$x=stsadm -o enumzoneurls
foreach ($zone in $x.ZoneUrls.Collection) {
[xml]$sites=stsadm -o enumsites -url $zone.Default;
foreach ($site in $sites.Sites.Site) {
write-host $site.Url;
$html=get-webpage -url $site.Url -cred $cred;
}
}
Then go to the windows scheduled task, add new task and scheduled when you want and run it.
You can understand the difference between default scheduled recycling and the warm up script.
clip_image002

Sharepoint Outlook Sidebar from Harmony

Harmony Outlook sidebar provides full featured access to documents within Sharepoint libraries. Using the Harmony sidebar documents in email attachments can be dragged to Sharepoint libraries and documents from Sharepoint libraries can be added as attachments or as links to emails. To cap it all Harmony Sidebar is Free!!!
Once the Harmony side bar is installed and the Sharepoint connection is setup, Sharepoint documents will be available in the side bar. Below screen shot shows contents of document library within the Harmony side bar
Sharepoint Side Bar - Harmony
Harmony Sidebar for Sharepoint can be downloaded from http://harmony.mainsoft.com/content/downloads/harmony-for-sharepoint

Best Practice Analyzer WSS and MOSS

What Best Practice Analyzer for WSS/MOSS can do?
The Microsoft Best Practices Analyzer for Microsoft Windows SharePoint Services 3.0 and the 2007 Microsoft Office System creates detailed reports to help administrators achieve greater performance, scalability, and uptime.
Install Best Practice Analyzer for WSS and MOSS 2007:
1. Download the best practice analyzer from the following URL.
2. Create the BPA folder on C drive.
3. Now run the downloaded file that Extracted to the C:\BPA folder.
Now we are going to execute the best practice analyzer on WSS/MOSS using command.
4. Start -> RUN-> CMD and type the following command.
Cd C:\BPA
Where C:\BPA is the location that contains the Microsoft Best Practices Analyzer for Microsoft Windows SharePoint Services 3.0 and the 2007 Microsoft Office System. (If the Microsoft Best Practices Analyzer for Microsoft Windows SharePoint Services 3.0 and the 2007 Microsoft Office System is in a different location, replace C:\BPA with that location.
5. Type the following command, and then press ENTER:
sharepointbpa.exe -cmd analyze -substitutions SERVER_NAME CentralAdministrationServer
where "CentralAdministrationServer" is the server name for your SharePoint Central Administration.
It is important that SERVER_NAME is included in the parameters capitalized and that CentralAdministratorServer is replaced with the server name that is running SharePoint Central Administration.
6. After the analysis is complete, open sharepointbpa.report.htm in a web browser.
sharepointbpa.report.htm will be in the same location that the Microsoft Best Practices Analyzer for Microsoft Windows SharePoint Services 3.0 and the 2007 Microsoft Office System was installed.
7. Exit the command. Now on the report html page you will get available Error  on your server and warning message with solution.
8. Find the Problem and resolve it one by one.

SharePoint Warm up Scripts for WSS/MOSS

Normally all the Application Pools that get created are scheduled to reset themselves at a certain time usually around 1.45 AM in the morning. Therefore if you browse the web site for the time, it takes long time to load the web application but instead of using this script, it speed the web application.
So if you want this script, add the below code I have provided in a PS1 script and scheduled in windows scheduled task list. You can remove those app pool recycles that are scheduled
Save the following in a script named SharepointWarmUpscript.ps1 (1 is numeric value one).
Code:
iisreset
############################################################################
#Assumptions:
#-Running on machine with WSS/MOSS
#-C:\Program Files\Common Files\Microsoft Shared\web server extensions\12\BIN in path
############################################################################
function get-webpage([string]$url,[System.Net.NetworkCredential]$cred=$null)
{
$wc = new-object net.webclient
if($cred -eq $null)
{
$cred = [System.Net.CredentialCache]::DefaultCredentials;
}
$wc.credentials = $cred;
return $wc.DownloadString($url);
}
#This passes in the default credentials needed. If you need specific stuff you can use something else to
#elevate basically the permissions. Or run this task as a user that has a Policy above all the Web Applications
#with the correct permissions
$cred = [System.Net.CredentialCache]::DefaultCredentials;
#$cred = new-object System.Net.NetworkCredential("username","password","machinename")
[xml]$x=stsadm -o enumzoneurls
foreach ($zone in $x.ZoneUrls.Collection) {
[xml]$sites=stsadm -o enumsites -url $zone.Default;
foreach ($site in $sites.Sites.Site) {
write-host $site.Url;
$html=get-webpage -url $site.Url -cred $cred;
}
}
Then go to the windows scheduled task, add new task and scheduled when you want and run it.
You can understand the difference between default scheduled recycling and the warm up script.
clip_image002

Best Practice Analyzer for WSS and MOSS 2007

What Best Practice Analyzer for WSS/MOSS can do?
The Microsoft Best Practices Analyzer for Microsoft Windows SharePoint Services 3.0 and the 2007 Microsoft Office System creates detailed reports to help administrators achieve greater performance, scalability, and uptime.
Install Best Practice Analyzer for WSS and MOSS 2007:
1. Download the best practice analyzer from the following URL.
2. Create the BPA folder on C drive.
3. Now run the downloaded file that Extracted to the C:\BPA folder.
Now we are going to execute the best practice analyzer on WSS/MOSS using command.
4. Start -> RUN-> CMD and type the following command.
Cd C:\BPA
Where C:\BPA is the location that contains the Microsoft Best Practices Analyzer for Microsoft Windows SharePoint Services 3.0 and the 2007 Microsoft Office System. (If the Microsoft Best Practices Analyzer for Microsoft Windows SharePoint Services 3.0 and the 2007 Microsoft Office System is in a different location, replace C:\BPA with that location.
5. Type the following command, and then press ENTER:
sharepointbpa.exe -cmd analyze -substitutions SERVER_NAME CentralAdministrationServer
where "CentralAdministrationServer" is the server name for your SharePoint Central Administration.
It is important that SERVER_NAME is included in the parameters capitalized and that CentralAdministratorServer is replaced with the server name that is running SharePoint Central Administration.
6. After the analysis is complete, open sharepointbpa.report.htm in a web browser.
sharepointbpa.report.htm will be in the same location that the Microsoft Best Practices Analyzer for Microsoft Windows SharePoint Services 3.0 and the 2007 Microsoft Office System was installed.
7. Exit the command. Now on the report html page you will get available Error  on your server and warning message with solution.
8. Find the Problem and resolve it one by one.

User Profile synchronization error/ Event id 5555

If the user profile is not synchronizing after you changed the property of the user property on SSP and if you found the following error message in your event log
clip_image002
then follow the following solution steps.
Solution Steps:
open the command prompt and run the following command.
stsadm -o sync -DeleteOldDatabases 0
then it removing the old data.
result-300x149
Now it should work properly.

Scroll Today’s date in Sharepoint Gantt Chart

Though the out of the box Gantt chart in Sharepoint is easy to setup and use, it has some drawbacks as well. One such drawback is that chart always starts from the start of the project and to go to Today’s date lot of scrolling will be required.
We have created a work around for this using JQuery and the ScrollTo plug-in. The idea we have used is to locate the Today’s cell using JQuery and then scroll to the cell using the ScrollTo plug-in code. Below are the steps that explains the process
1. Download the ScrollTo plug-in from http://plugins.jquery.com/project/ScrollTo
2. Add jquery.scrollTo.js file to a Sharepoint document library
3. Add a content editor webpart to the page that has the Sharepoint Gantt chart. Make sure that the content editor webpart is added after the Gantt chart.
4. Add the below code in the source editor of the content editor webpart
 

5. Make sure to change the path of jquery.scrollTo.js to a location with your Sharepoint
6. Now when the Gantt chart is viewed it will scroll to Today’s date
Sharepoint Gantt Chart

Improve performance of SharePoint internet sites

Faster loading websites are need of the day as even a minor delay in the website response could cause frustration on the visitors part. Faster websites lead to happy users which in turn lead to increased business. A study by Google reveals that visitors spend less time in websites that are slow.
With our experience in building internet websites with Sharepoint we have acquired knowledge of several techniques that will greatly improving the website performance. Some of the techniques are listed below
1. Setup compression at web server level
2. Setup caching at web server level
3. Remove Core.js and other scripts that are used internally Sharepoint but required for anonymous users
4. Remove unwanted styles and markups from Sharepoint master page
5. Remove unwanted images
6. Minify Java script files and style sheets
7. Use CSS sprites
8. Remove unwanted web parts
After applying the performance enhancement techniques the speed of Sharepoint internet websites have increased drastically. If you want IOTAP to help you with improving your Sharepoint website performance drop in an email to info@iotap.com

The server returned non-specific error in sp designer

Every SharePoint developer who has worked with extensively with dataview webpart in SharePoint Designer would have encountered the below misleading error at least once
“The server returned a non-specific error when trying to get data from the data source. Check the format and content of your query and try again. If the problem persists, contact the server administrator.”
There are several solutions out there in the web for this error like the ones listed below but none of them are sure shot fixes
After having tried out several solutions with no luck we tried copy the datasource from a newly created dataview and replace the datasource in the erroneous dataview. Gotcha this worked.  Below are the steps we did
1. Create a new page in SharePoint designer.
2. Add a dataview webpart to the new page and set the datasource as the same list or library that the erroneous dataview uses.
3. Switch to the code view.
3. Open the page with the erroneous dataview in code view mode.
4. Copy the datasource element from the dataview in new page
5. Replace the datasource element of the erroneous dataview with the copied datasource element

Use of Colligo Reader For SharePoint and Installation

Purpose of Colligo Reader for SharePoint:
Colligo enables you to easily download content from SharePoint sites to your laptop or machine so you can access the content offline such as document libraries offline, Get read-access to document and forms, view customs and standard lists, Access events, issues, links, contacts, tasks and agendas rather than having to copy files one by one through a browser. Reader is a client-only application - no server modifications are required. Colligo Reader works with all shipping versions of SharePoint, including Windows® SharePoint® Services (WSS 3.0 & 2.0), Microsoft® Office SharePoint® Server (MOSS 2007), and SharePoint® Portal Server (SPS 2003).
Installation:
Download the Colligo Reader for SharePoint and install it from http://www.colligo.com/products/sharepoint/reader.asp
clip_image002
clip_image004
clip_image006
clip_image008
clip_image010
clip_image012
clip_image014
Create a new downloadable site whatever your SharePoint site with your credentials. Select and download the content based on your requirement and synchronize it. It will get downloaded and everything is offline now.
clip_image016
clip_image018
clip_image020
clip_image022
For more information click here

Best Practice Analyzer for Windows SharePoint service 3.0 and MOSS 2007

What Best Practice Analyzer for WSS/MOSS can do?
The Microsoft Best Practices Analyzer for Microsoft Windows SharePoint Services 3.0 and the 2007 Microsoft Office System creates detailed reports to help administrators achieve greater performance, scalability, and uptime.
Install Best Practice Analyzer for WSS and MOSS 2007:
1. Download the best practice analyzer from the following URL.
2. Create the BPA folder on C drive.
3. Now run the downloaded file that Extracted to the C:\BPA folder.
Now we are going to execute the best practice analyzer on WSS/MOSS using command.
4. Start -> RUN-> CMD and type the following command.
Cd C:\BPA
Where C:\BPA is the location that contains the Microsoft Best Practices Analyzer for Microsoft Windows SharePoint Services 3.0 and the 2007 Microsoft Office System. (If the Microsoft Best Practices Analyzer for Microsoft Windows SharePoint Services 3.0 and the 2007 Microsoft Office System is in a different location, replace C:\BPA with that location.
5. Type the following command, and then press ENTER:
sharepointbpa.exe -cmd analyze -substitutions SERVER_NAME CentralAdministrationServer
where "CentralAdministrationServer" is the server name for your SharePoint Central Administration.
It is important that SERVER_NAME is included in the parameters capitalized and that CentralAdministratorServer is replaced with the server name that is running SharePoint Central Administration.
6. After the analysis is complete, open sharepointbpa.report.htm in a web browser.
sharepointbpa.report.htm will be in the same location that the Microsoft Best Practices Analyzer for Microsoft Windows SharePoint Services 3.0 and the 2007 Microsoft Office System was installed.
7. Exit the command. Now on the report html page you will get available Error  on your server and warning message with solution.
8. Find the Problem and resolve it one by one.

Installing Office 2010 Web Apps

You will need to download Office Web Apps from the Microsoft Download Site.  This download is available to Volume licensing customers or those with TechNet and MSDN subscriptions.  Let’s begin by launching the setup.exe and entering our product key;
image thumb Installing Office Web Apps for SharePoint 2010
Accept the licensing terms.
image thumb1 Installing Office Web Apps for SharePoint 2010
Click Continue
Choose a file location for installation.  Ensure you select a drive with adequate free space for your Data partition which stores the Office Web Apps search index files.
image thumb2 Installing Office Web Apps for SharePoint 2010
Click Install Now
Upon successful installation, you will be greeted with the “Run Configuration Wizard” window.  We will immediately run the configuration wizard by leaving the checkbox ticked and clicking close.  You can also achieve the same by running PSConfig.  Both methods will register the Office Web Apps services.
image thumb3 Installing Office Web Apps for SharePoint 2010
Click Close to Run the SharePoint Configuration Wizard.
image thumb4 Installing Office Web Apps for SharePoint 2010
Click Next and click Yes to acknowledging the restart of the IIS, SharePoint Administration and Timer Services.
image
Click Next
image thumb6 Installing Office Web Apps for SharePoint 2010
Click Finish to acknowledge the successful configuration.
image
You will then receive the below Central Administration screen regarding configuring your SharePoint farm.  Because we have been configuring each service application one by one as needed (best practice) we will click cancel and proceed to activate the Office Web Apps services individually.
image thumb8 Installing Office Web Apps for SharePoint 2010
Provisioning the Office Web Apps Service Applications
Let’s begin by starting the relevant Office Web Apps services located under Central Administration / System Settings / Manage services on server.
Scroll down until you locate all of the Office Web Apps specific services, namely Excel Calculation Services, PowerPoint Service and Word Viewing Service.  Click Start for each respective service.
image thumb9 Installing Office Web Apps for SharePoint 2010
Let’s now navigate to Central Administration / Application Management / Manage service applications.
Click on New / Word View Service
Enter the following details to complete the creation of the Word Viewing Service Application.  Ensure that you select “SharePoint Web Services System” from the Use existing application pool option.
image
Click OK
Your service application will then proceed with the creation process and will be listed with our previously provisioned service applications.
image thumb11 Installing Office Web Apps for SharePoint 2010
You can now further provision the “Excel Services Application” and “PowerPoint Service Application” in the same manner following the above steps.  Please note that there isn’t a separate service application for OneNote.
Activating Office Web Apps
Depending on where you want the feature activated, you will venture to your Site Collection(s) and activate each one individually or you can utilise PowerShell to activate multiple site collections at once within a single script.
From within your SharePoint Site, click on Site Actions / Site Settings.
Under Site Collection Administration, click on Site Collection Features.
Navigate down the page until you find Office Web Apps and click on Activate.
image thumb12 Installing Office Web Apps for SharePoint 2010
You should now be able to open a Microsoft Word document from a document library on your SharePoint site and it should launch within the browser by default.
image